Cómo editar carretes en Instagram: Conceptos básicos de edición que debe conocer

Instagram | 16 de mayo de 2024
Si quieres triunfar en Instagram, no puedes limitarte para siempre a imágenes sencillas y publicaciones en formato carrusel. Tienes que lanzarte a los Reels: esos vídeos breves y concisos que todo el mundo está viendo sin parar. Según HypeAuditor, los Reels son el formato Instagram con mayor alcance. Por eso, son imprescindibles para cualquier creador de contenido. Por supuesto, tendrás que saber cómo editar Reels en Instagram lanzarte a publicar vídeos virales en esta plataforma.
Tus Reels no tendrán éxito ni se harán virales si no los editas bien. Desde un audio atractivo hasta transiciones fluidas, debes ser capaz de contar una historia interesante de forma eficaz mediante una edición bien pensada e ingeniosa.
Por eso, hoy nos hemos propuesto guiarte a través del proceso de edición de Reels. Al final de esta guía, deberías conocer los conceptos básicos para editar Instagram y que destaquen. ¡Sigue leyendo para descubrir más!

Cómo editar carretes en Instagram: 4 funciones básicas que debes conocer
No te preocupes: nadie espera que, de la noche a la mañana, sepas editar Reels como un cineasta o un director de cine profesional. Sin embargo, lo mínimo que puedes hacer es aprender las funciones básicas de edición del editor de Reels Instagram. De ese modo, podrás empezar a crear Reels entretenidos y relevantes para tu público mientras vas aprendiendo poco a poco las funciones más avanzadas.
Conocer los conceptos básicos de la edición es una forma estupenda de dar los primeros pasos en el mundo de Reels. Incluso con conocimientos mínimos, puedes expresarte de forma creativa a través de vídeos cortos. Además, también te adelantas a la competencia, sobre todo si los principales rivales de tu marca en el sector no dominan Reels. Si dominas el proceso de edición y publicas Reels interesantes, podrás captar la atención de tu público y consolidar tu marca.
¿Estás listo para aprender lo básico sobre cómo editar un carrete en Instagram? Aquí tienes cinco técnicas clave con las que debes familiarizarte para empezar tu viaje.
1. Cómo editar la longitud de los clips en las bobinas
En primer lugar, veamos cómo editar la duración de un clip en Reels. Cuando editas la duración de un clip, lo «recortas» para eliminar las partes que no son relevantes. De esta forma, puedes dejar más espacio para clips de vídeo importantes dentro de tu Reel. Recortar los clips también es importante si quieres que tus vídeos sigan un ritmo concreto.
A continuación te explicamos cómo añadir un vídeo o una foto a tu Carrete y luego editar su duración en el vídeo final.
1. En la página Instagram , haz clic en el signo más que aparece en la parte inferior para publicar una nueva entrada.
2. Selecciona Carrete e importa fotos y vídeos de tu galería para añadirlos a tu proyecto. También puedes grabar una foto o un vídeo in situ con la cámara.
3. Una vez que hayas seleccionado o grabado los fragmentos de vídeo, aparecerán como barras en el editor de Reels.
4. Pulse sobre el clip que desea recortar. Debería ver un recuadro amarillo con bordes más gruesos rodeando esa barra. Eso significa que ha seleccionado ese clip.
5. Haz clic en cualquiera de los extremos del clip y arrástralo para recortarlo. Si lo arrastras hacia la derecha, se acortará; si lo arrastras hacia la izquierda, se alargará. Puedes repetir este proceso varias veces hasta que consigas la duración deseada para el vídeo.
2. Cómo recortar música en Instagram Reels
Añadir música es una forma estupenda de hacer que tus Reels sean más dinámicos y emocionantes. A veces, la música de fondo y los efectos de sonido pueden marcar la diferencia entre el éxito y el fracaso de tu Reel. Por eso, es importante que sepas cómo añadir música a tus vídeos cortos.
Pero no basta con añadir cualquier sonido y ya está. También hay que tener cuidado con las partes de la canción que se incluyen en el Reel. Por eso es tan importante aprender a recortar música en Instagram Reels.
A continuación te explicamos, paso a paso, cómo añadir y recortar música en tus Reels:
1. En el editor de Reels, pulsa el botón «Añadir audio» situado en la parte inferior de la pantalla. Debería tener el icono de una nota musical. También puedes hacer clic en «Pulsa para añadir audio », que aparece debajo de los clips de vídeo que hayas importado.
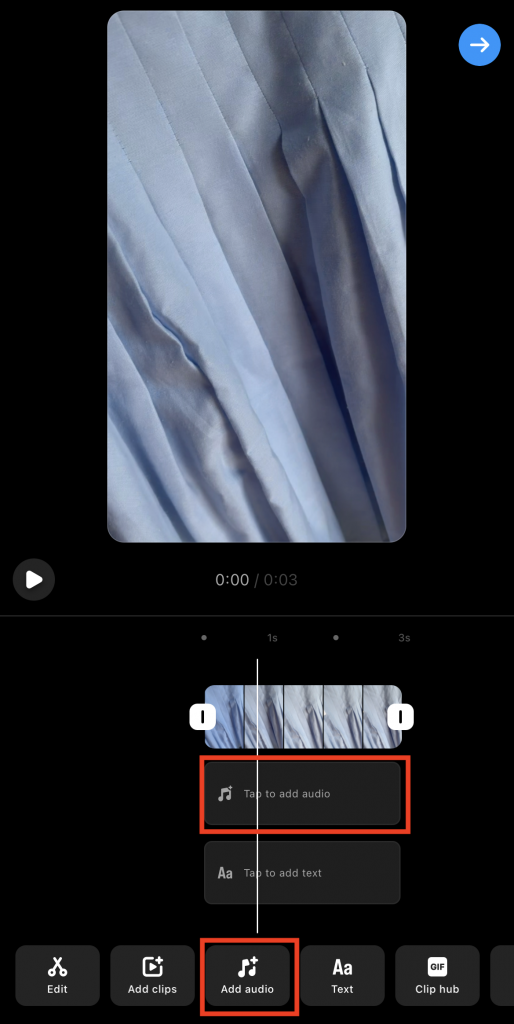
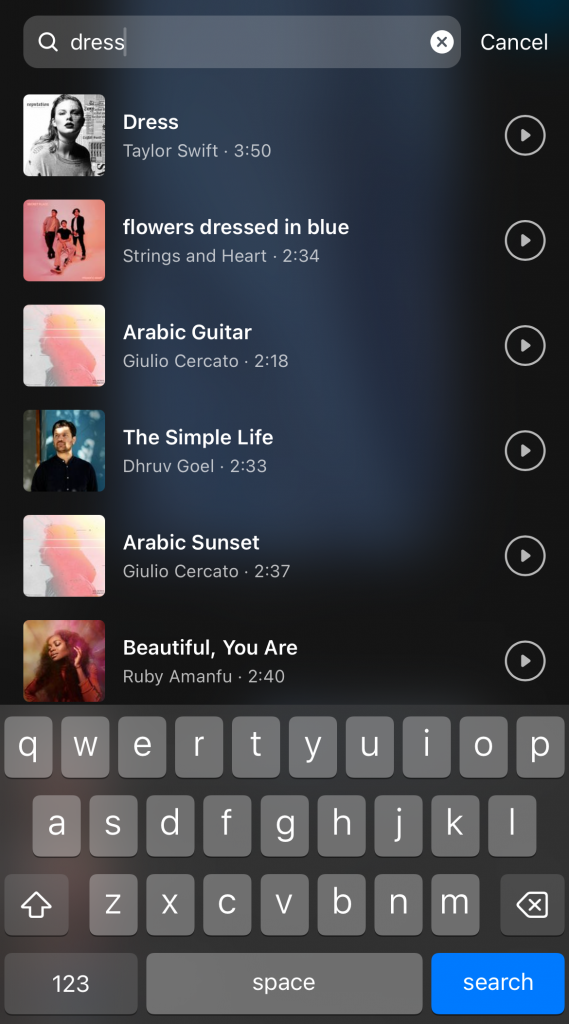
2. Aparecerá la biblioteca de música. Escribe la canción que quieras incluir en tu Carrete.
3. Busca la canción entre los resultados que aparecen y tócala una vez que la encuentres.
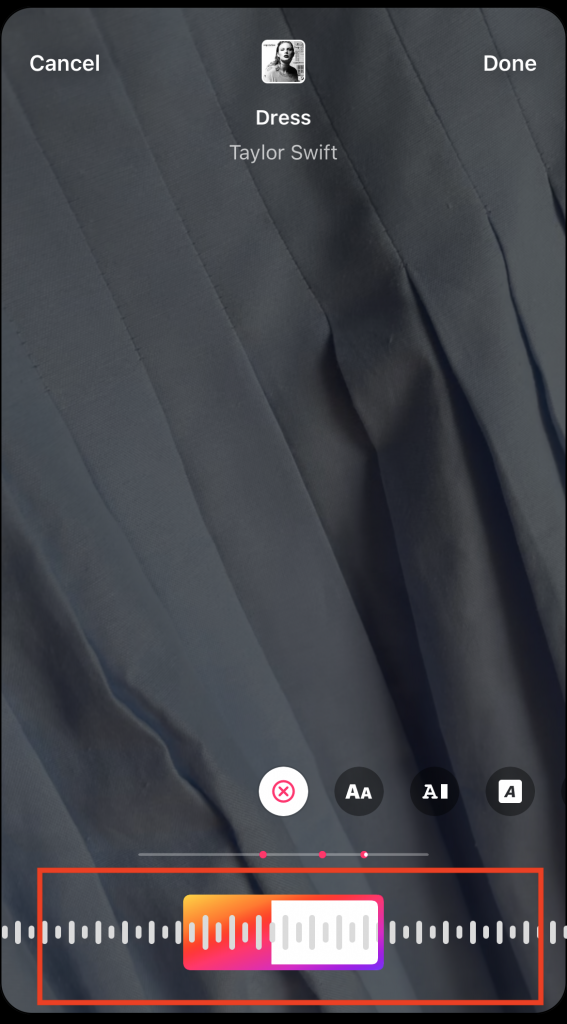
4. En la siguiente pantalla, oirás cómo suena tu canción. Arrastra la barra situada en la parte inferior de la pantalla para elegir qué parte de la canción quieres añadir a tu Reel. A continuación, pulsa «Hecho».
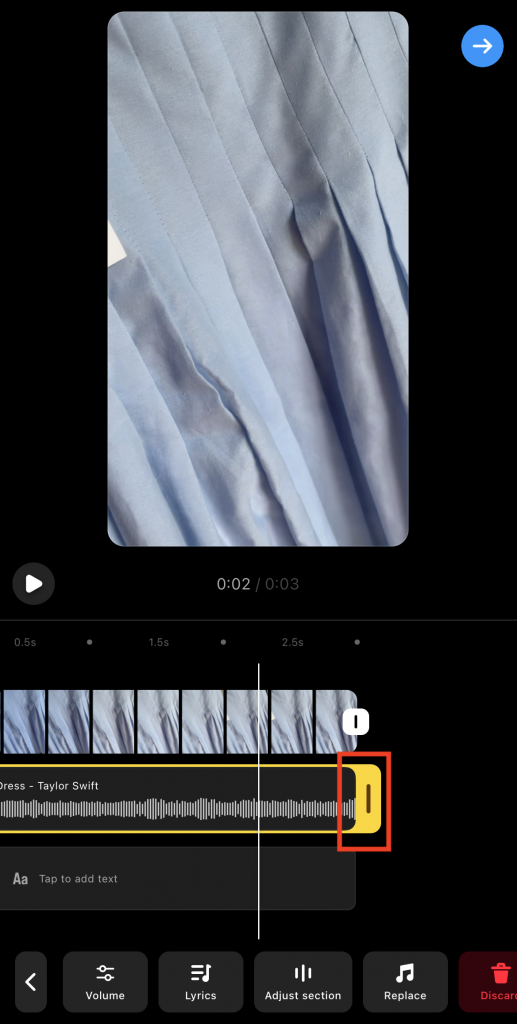
5. Arrastre los bordes del clip de audio en el editor Reels para recortarlo o alargarlo.
3. Cómo añadir texto superpuesto a tus clips de vídeo
Añadir superposiciones de texto es una forma estupenda de aportar más contexto a tus vídeos. También es una opción fantástica como subtítulos, por si acaso tus espectadores ven tu Reel con el sonido desactivado. De esta forma, seguirás transmitiendo tu mensaje. A continuación te explicamos cómo añadir estas superposiciones a tus vídeos:
1. En el editor de Reels, haz clic en el icono de «Texto» situado en la parte inferior de la pantalla. También puedes hacer clic en «Toca para añadir texto» debajo del clip de música que hayas seleccionado.
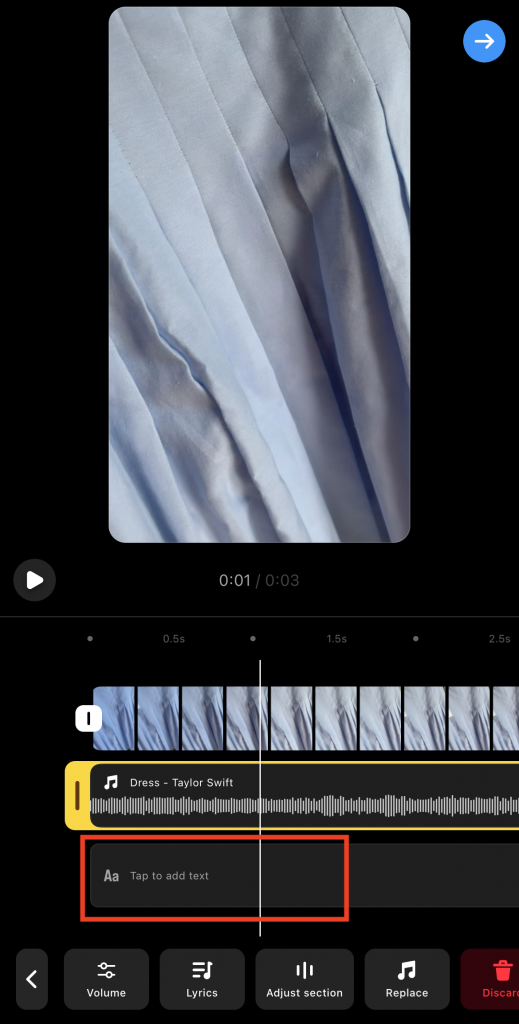
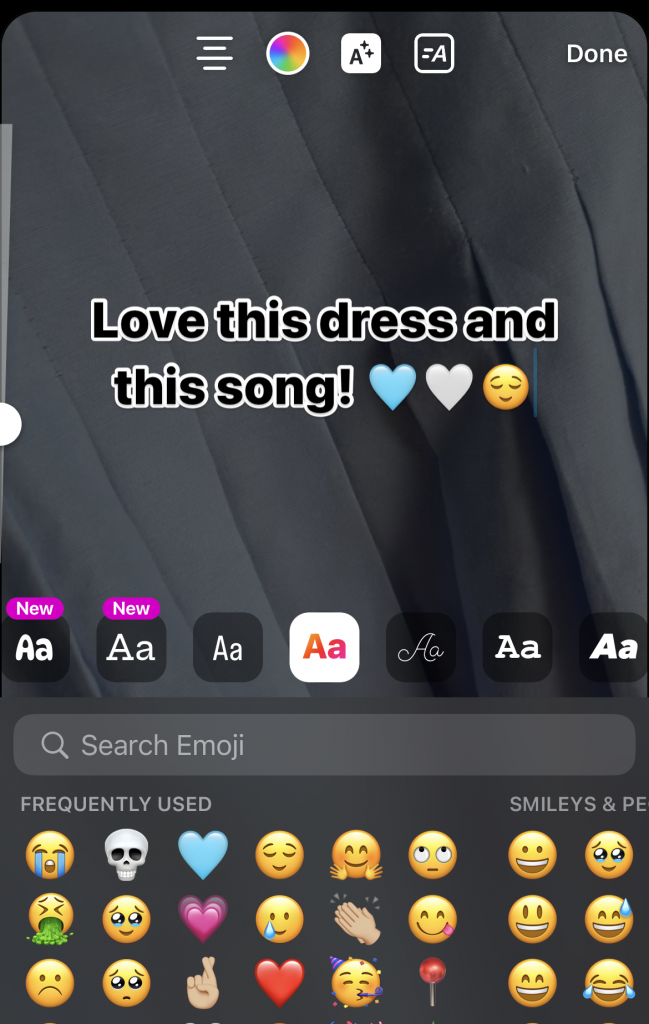
2. Seleccione uno de los muchos tipos de letra disponibles.
3. Escribe lo que quieres que diga tu texto superpuesto.
4. Personaliza tu texto con diferentes colores, contornos y efectos de animación.
5. Cuando estés satisfecho con el texto, haz clic en «Hecho».
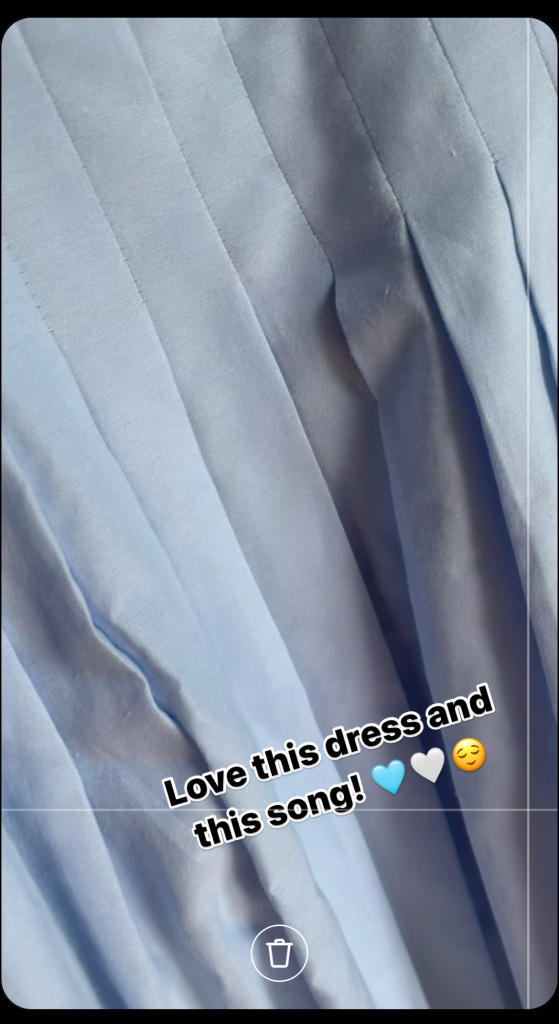
6. Pellizca y arrastra el texto superpuesto para colocarlo en el lugar exacto que desees de tu Carrete.
7. Vuelva a hacer clic en Listo .
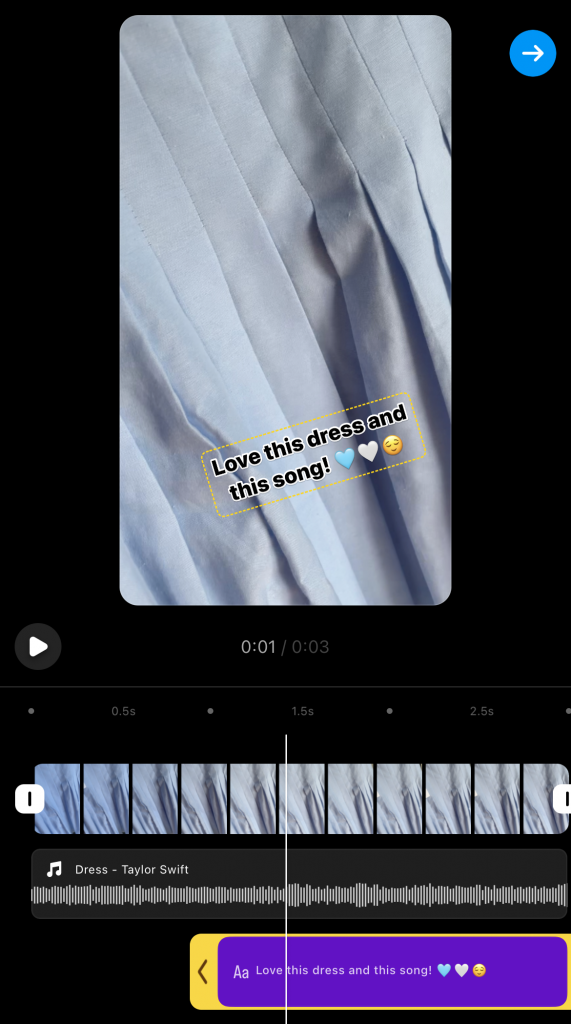
8. Al igual que con el vídeo y el audio, arrastra los bordes de la superposición de texto para recortarla o alargarla.
4. Cómo utilizar una pantalla verde para conseguir carretes más creativos
Esta no es tan sencilla, pero es una técnica que se ha vuelto muy popular en Instagram. Si quieres triunfar en Reels, tienes que entender, al menos, cómo funciona.
El uso de una pantalla verde te permite crear todo tipo de fondos para tus Reels. Es una herramienta fantástica para dar rienda suelta a tu creatividad, sobre todo cuando tus vídeos contienen una gran cantidad de narrativa. Así es como funciona en Reels:
1. Instala una pantalla verde en tu casa o estudio.
2. Colócate frente a la pantalla y graba tus vídeos.
3. Descarga una aplicación de edición que utilice la técnica de croma, también conocida como «pantalla verde». Te recomendamos encarecidamente KineMaster, una de las mejores aplicaciones de terceros para editar Reels.
4. Abre la aplicación e importa tus vídeos de pantalla verde.
5. Utiliza la función de croma de la aplicación para cambiar el fondo de tus clips. Puedes utilizar otros vídeos y fotos como fondo
6. Edita tus vídeos como quieras y guárdalos en tu dispositivo. Súbelos al editor Instagram Reels y realiza las ediciones necesarias desde allí.
¿Se puede editar un carrete después de publicarlo?
Instagram te Instagram editar publicaciones como fotos y carruseles, pero ¿se puede editar un Reel después de publicarlo?
Sí, hay algunas cosas que puedes modificar o cambiar en tus Reels después de publicarlos. Entre ellas se incluyen la foto de portada, el pie de foto y la ubicación de tu publicación de Reel. Para ello, ve al Reel en tu Instagram . A continuación, pulsa los tres puntos situados en la parte superior del vídeo y selecciona«Editar». Desde ahí, podrás realizar los cambios necesarios en los datos básicos.
Sin embargo, no puedes modificar nada del vídeo ni de cómo lo has editado. Si quieres cambiar la forma en que has editado tu Reel, la única opción es borrarlo y volver a publicarlo.
Instagram una plataforma conocida por preservar la autenticidad a toda costa. Por eso no permite editar los Reels que ya se han publicado y que han visto muchas personas. Cuando editas un vídeo, básicamente estás alterando la estética y el mensaje de tu publicación. Esto puede resultar engañoso para nuevas audiencias, sobre todo si la publicación original ha obtenido muchas visualizaciones e interacción.
¿Se puede añadir música a un carrete después de publicarlo?
¿Te preguntas: «¿Se puede añadir música a un Reel después de publicarlo?» Por desgracia, al igual que ocurre con la edición de los clips de vídeo, no es posible añadir ni editar música en un Reel ya publicado.
¿No estás seguro de que te guste el audio original que suena de fondo en los clips de vídeo de tu Reel? Lo entendemos. A veces, solo te das cuenta de que hay que mejorar algo después de ver el Reel completo una vez publicado. Quizás se te hayan ocurrido efectos de sonido mejores para tu Reel que los que has utilizado. O quizá no puedas soportar que uno de tus clips no vaya al compás de la canción de fondo. Por desgracia, la única forma de cambiar la música de fondo de tu Reel es borrarlo, volver a editarlo y volver a publicarlo.
Ya lo sabemos, es un rollo. Pero si crees que tu Reel puede resultar diez veces más atractivo con otra música de fondo, ¡adelante!
Los mejores filtros para carretes Instagram
Utilizar los filtros de Instagram es una forma estupenda de mejorar y dar un toque de dinamismo al aspecto de tus fotos. Pero, ¿sabías que tus filtros fotográficos favoritos también están disponibles en Reels?
Los filtros garantizan que todos los clips de vídeo de tu Reel tengan un aspecto y un tono uniformes. Cuando eliges el filtro adecuado, tu Reel también resulta más llamativo, lo cual es genial para conseguir más visualizaciones. Además, es perfecto para darle un toque visual especial a los Reels, incluso si no sabes cómo hacer la corrección de color.
¿Quieres elevar el estado de ánimo y la sensación de tu Reel con un filtro chulo? Aquí tienes algunos de los mejores filtros para Instagram Reels:
- París: Aporta luminosidad y suavidad a tus vídeos para conseguir un acabado fluido y ligero.
- Oslo: Aumenta el contraste y la calidez para un vídeo de aspecto acogedor.
- Tokio: Un filtro clásico en blanco y negro que añade un toque de mal humor a tu Carrete.
- Jaipur: Aumenta la saturación del color a la vez que suaviza los tonos, creando un aspecto vivo.
- Río de Janeiro: Añade un degradado de color a tus clips de vídeo para crear un ambiente alegre y vibrante.
Además de los filtros fotográficos, quizá también te interese utilizar filtros de realidad aumentada (también conocidos como filtros RA) en Reels. Estos filtros añaden objetos en 3D y elementos digitales a tu entorno real a través de la pantalla. La mayoría de las veces, la gente utiliza los filtros RA para retocar sus rostros en los vídeos. Los filtros pueden añadirte algo de maquillaje al rostro o elementos de diseño y accesorios bonitos en la pantalla.
¿Quieres publicar un Reel tuyo con un filtro AR para conseguir un vídeo más dinámico? Sólo tienes que grabar un vídeo tuyo con el filtro que prefieras en el editor de Reels.
Haz que tus carretes alcancen todo su potencial aumentando tu audiencia en IG
Editar Instagram puede parecer complicado. Pero recuerda: la práctica hace al maestro. Da los primeros pasos e intenta crear Reels sencillos con técnicas básicas de edición. Practica cómo recortar fragmentos de vídeo, añadir texto superpuesto y experimentar con la música en tus vídeos. En poco tiempo le cogerás el truco y empezarás a explorar funciones más avanzadas, como el uso de pantallas verdes y transiciones fluidas.
Ahora que ya sabes cómo editar los Reels en Instagram, es hora de dar el siguiente paso: conseguir visualizaciones. La mejor forma de hacerlo es asegurándote de que tienes una audiencia activa. En eso es en lo que Path Social echarte una mano.
Nuestro algoritmo exclusivo identifica a tu público objetivo. A continuación, utilizaremos estrategias promocionales de primera categoría para dar a conocer tu contenido. No solo notarás un montón de «me gusta», comentarios e interacciones en tus publicaciones, sino que también ganarás muchos seguidores nuevos. Lo mejor de todo es que todos estos nuevos seguidores son 100 % reales, nunca falsos. ¡Haz crecer tu cuenta Instagram nosotros hoy mismo!



¿Quieres aumentar tu Instagram de forma natural?
Descubre una plataforma diseñada para ayudar a los creadores a llegar a seguidores reales y comprometidos, sin atajos.
Explora la plataforma