Comment éditer des bobines sur Instagram: Les bases du montage que vous devez connaître

Instagram | 16 mai 2024
Si vous voulez vous démarquer sur Instagram, vous ne pouvez pas vous contenter indéfiniment de simples images et de publications en carrousel. Vous devez vous lancer dans les Reels, ces petites vidéos courtes et concises que tout le monde regarde à tout va. Selon HypeAuditor, les Reels constituent le format Instagram qui bénéficie de la plus grande portée. C'est donc un incontournable pour tout créateur de contenu. Bien sûr, vous devrez savoir comment monter des Reels sur Instagram vous lancer dans la publication de vidéos Reels virales.
Vos Reels ne rencontreront pas le succès et ne deviendront pas viraux si vous ne les montez pas correctement. Qu'il s'agisse d'un son captivant ou de transitions fluides, vous devez être capable de raconter une histoire intéressante de manière efficace grâce à un montage soigné et plein d'esprit.
C'est pourquoi nous nous sommes donné pour mission aujourd'hui de vous guider à travers le processus de montage des Reels. À la fin de ce guide, vous devriez maîtriser les bases du montage Instagram pour qu'ils soient du plus bel effet. Continuez à faire défiler pour en savoir plus !
Comment éditer des bobines sur Instagram: 4 fonctions de base à connaître
Ne t'inquiète pas : personne ne s'attend à ce que tu saches monter des Reels comme un cinéaste ou un réalisateur professionnel du jour au lendemain. Cependant, tu peux au moins commencer par te familiariser avec les fonctionnalités de montage de base de l'éditeur Reels Instagram. Ainsi, tu pourras commencer à créer des Reels divertissants et pertinents pour ton public tout en apprenant progressivement à maîtriser des fonctionnalités plus avancées.
Maîtriser les bases du montage est un excellent moyen de faire vos premiers pas dans l'univers des Reels. Même avec des connaissances minimales, vous pouvez vous exprimer de manière créative à travers des vidéos courtes. De plus, cela vous permet de devancer la concurrence, surtout si les principaux concurrents de votre marque dans le secteur ne maîtrisent pas encore les Reels. En maîtrisant parfaitement le processus de montage et en publiant des Reels captivants, vous pouvez susciter l'intérêt de votre public et renforcer votre image de marque.
Êtes-vous prêt à apprendre les bases du montage d'une bobine sur Instagram? Voici cinq techniques clés avec lesquelles vous devez vous familiariser pour commencer votre voyage.
1. Comment modifier la longueur des clips dans les bobines
Commençons par voir comment modifier la durée d’un clip dans Reels. Lorsque vous modifiez la durée d’un clip, vous le « découpez » afin d’en supprimer les parties qui ne sont pas pertinentes. Vous pouvez ainsi faire de la place pour des séquences vidéo importantes au sein de votre Reel. Le découpage des clips est également important si vous souhaitez que vos vidéos suivent un rythme précis.
Voici comment ajouter une vidéo ou une photo à votre bobine, puis modifier sa longueur dans la vidéo finale.
1. Sur la page Instagram , cliquez sur le signe « + » en bas de l'écran pour publier un nouveau post.
2. Sélectionnez Reel et importez des photos et des vidéos de votre galerie pour les ajouter à votre projet. Vous pouvez également enregistrer une photo ou une vidéo sur place à l'aide de l'appareil photo.
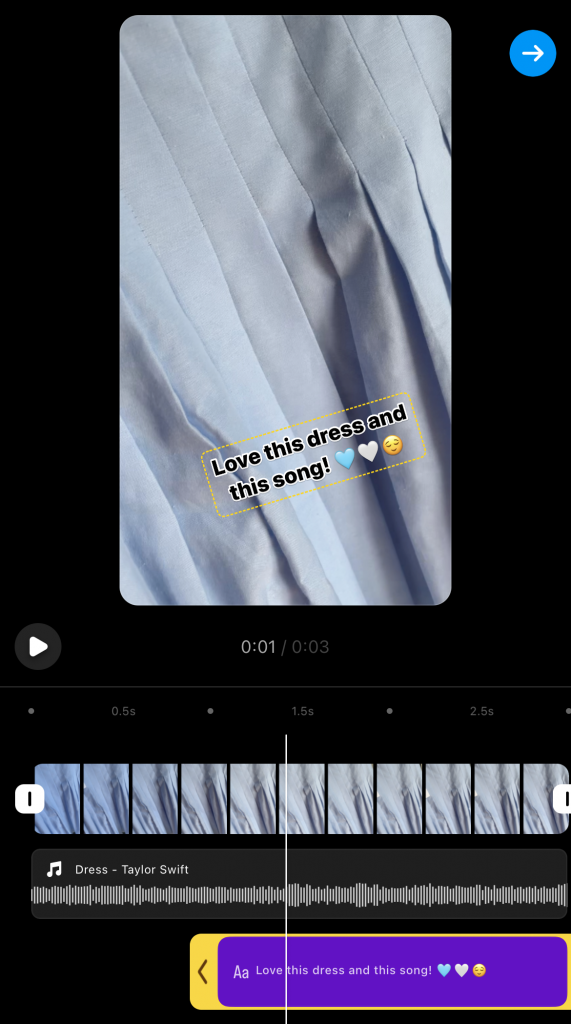
3. Une fois que vous aurez sélectionné ou enregistré des extraits vidéo, ceux-ci s'afficheront sous forme de barres dans l'éditeur Reels.
4. Tapez sur le clip que vous souhaitez découper. Vous devriez voir une boîte jaune avec des bords plus épais entourant cette barre. Cela signifie que vous avez sélectionné ce clip.
5. Cliquez sur l'un des bords du clip et faites-le glisser pour le découper. En le faisant glisser vers la droite, vous raccourcirez la vidéo, tandis qu'en le faisant glisser vers la gauche, vous l'allongerez. Vous pouvez répéter cette opération autant de fois que nécessaire jusqu'à obtenir la durée souhaitée pour la vidéo.
2. Comment couper la musique sur les bobines Instagram
Ajouter de la musique est un excellent moyen de rendre vos Reels plus dynamiques et captivants. Parfois, la musique de fond et les effets sonores peuvent faire toute la différence dans la réussite de votre Reel. Il est donc important de savoir comment ajouter de la musique à vos courtes vidéos.
Mais vous ne pouvez pas vous contenter d'ajouter n'importe quel son et de vous arrêter là. Vous devez également faire preuve de stratégie quant aux parties d'une chanson que vous incluez dans votre bobine. C'est pourquoi il est tout aussi important d'apprendre à découper la musique sur les bobines Instagram .
Voici comment ajouter et découper de la musique dans vos Reels, étape par étape :
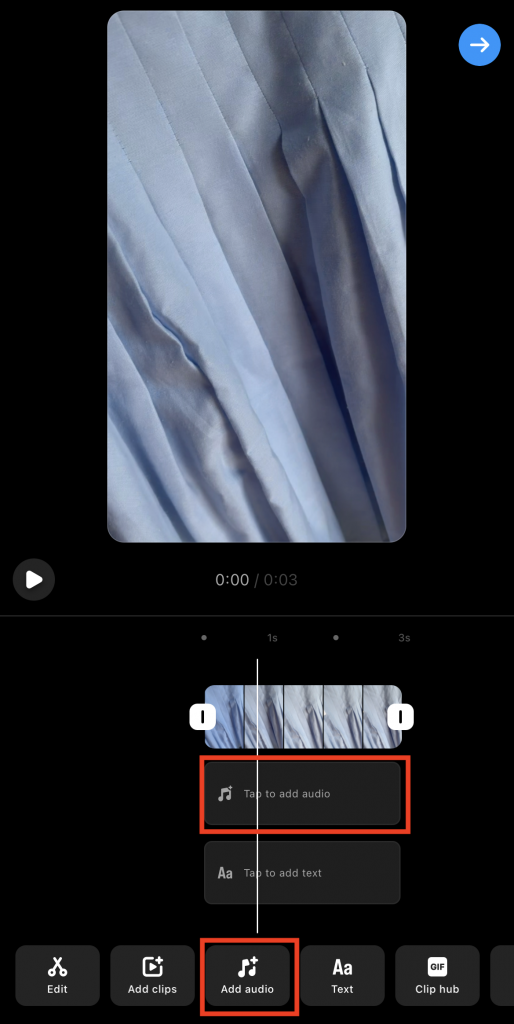
1. Dans l'éditeur Reels, appuyez sur le bouton « Ajouter un son » situé en bas de l'écran. Il devrait être représenté par une icône en forme de note de musique. Vous pouvez également cliquer sur « Appuyez ici pour ajouter un son » sous vos clips vidéo importés.
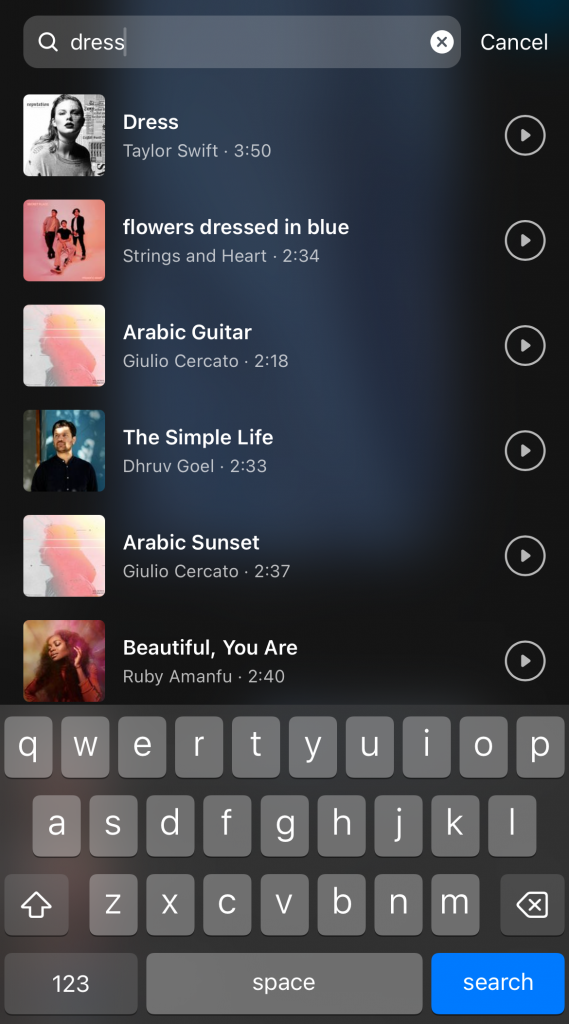
2. La bibliothèque musicale s'affiche. Tapez la chanson que vous souhaitez inclure dans votre Bobine.
3. Recherchez la chanson dans les résultats qui s'affichent et touchez-la une fois que vous l'avez trouvée.
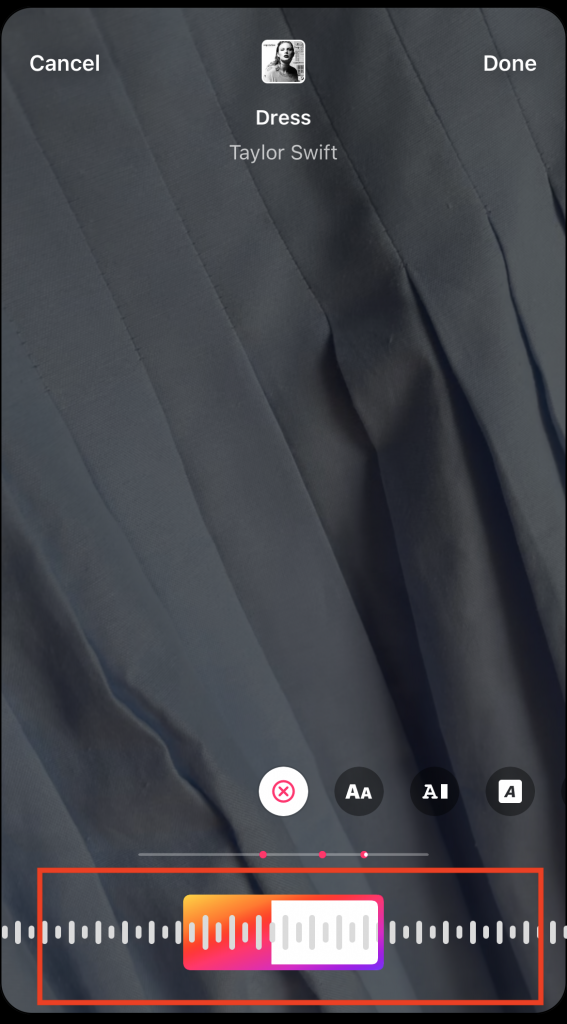
4. Sur l'écran suivant, vous entendrez votre morceau. Faites glisser la barre située en bas de l'écran pour choisir la partie que vous souhaitez ajouter à votre Reel. Cliquez ensuite sur « Terminé ».
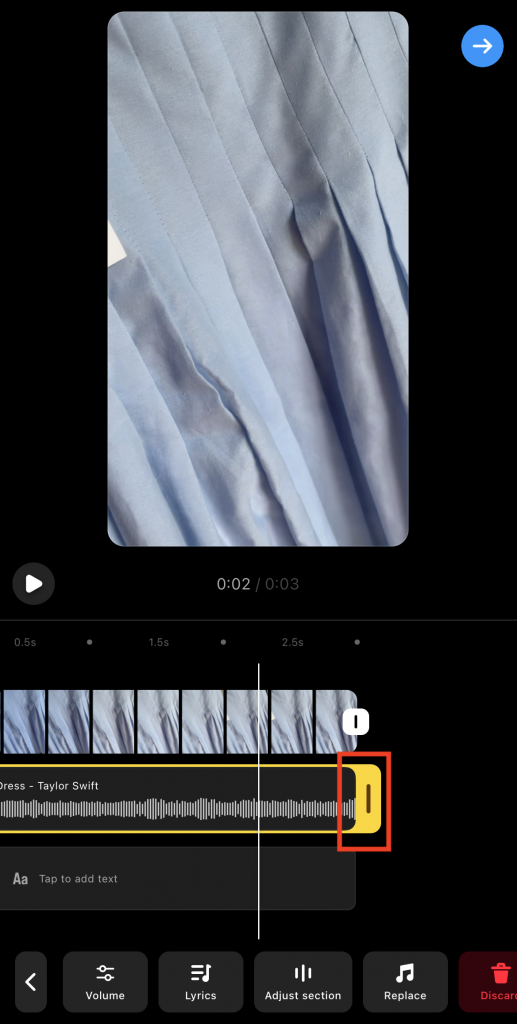
5. Faites glisser les bords du clip audio dans l'éditeur de bobines pour le réduire ou l'allonger.
3. Comment ajouter une incrustation de texte à vos clips vidéo
L'ajout de textes en superposition est un excellent moyen d'enrichir le contexte de vos vidéos. C'est également une solution idéale pour servir de sous-titres, au cas où vos spectateurs regarderaient votre Reel sans le son. Ainsi, votre message passe quand même. Voici comment ajouter ces superpositions à vos vidéos :
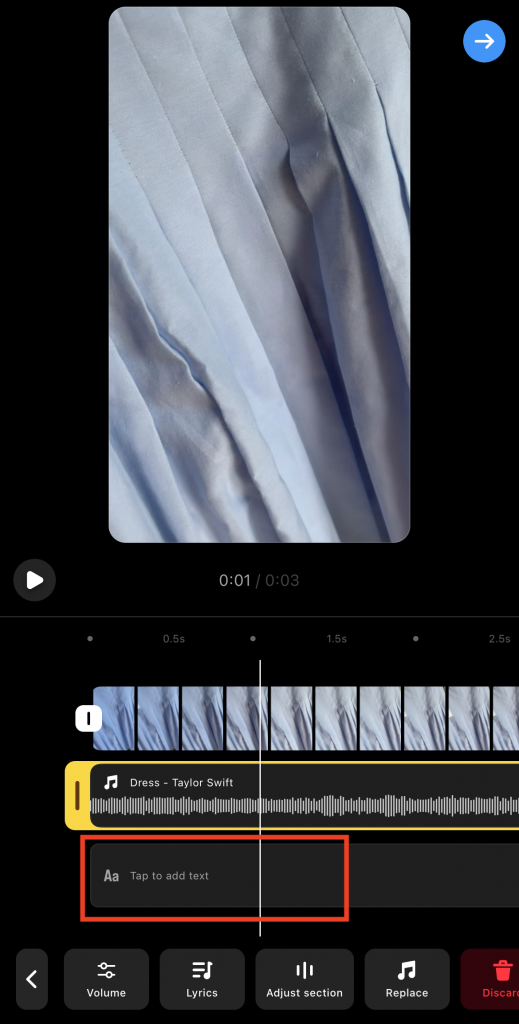
1. Dans l'éditeur Reels, cliquez sur l'icône « Texte » en bas de l'écran. Vous pouvez également cliquer sur « Appuyez pour ajouter du texte » sous l'extrait musical que vous avez sélectionné.
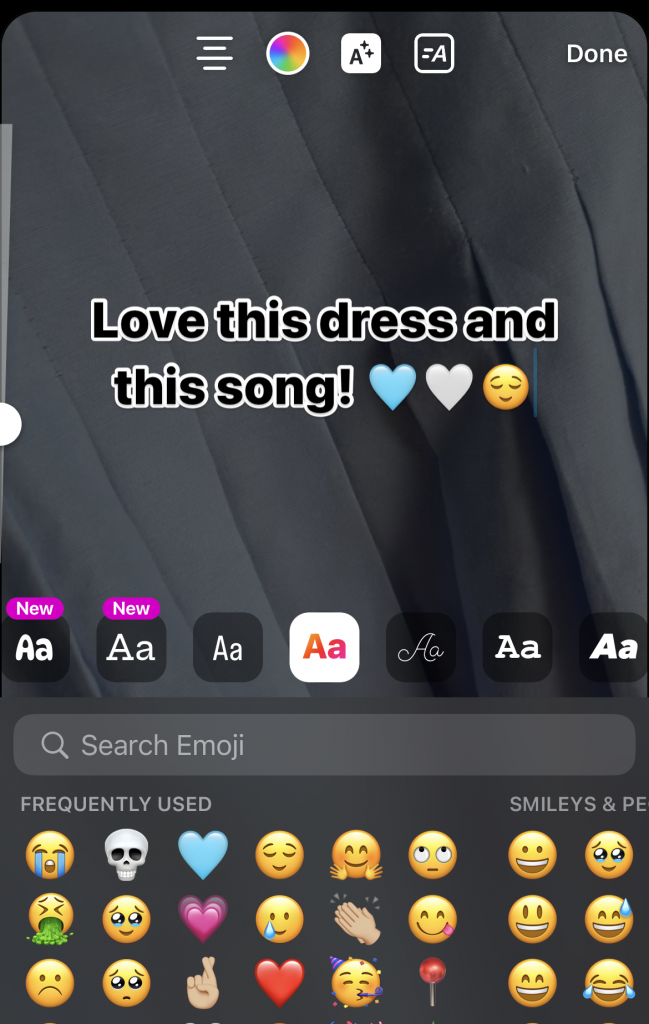
2. Sélectionnez l'une des nombreuses polices de caractères disponibles.
3. Tapez ce que vous voulez que votre texte superposé dise.
4. Personnalisez votre texte en choisissant différentes couleurs, des contours et des effets d'animation.
5. Lorsque vous êtes satisfait de votre texte, cliquez sur « Terminé ».
6. Pincez et faites glisser votre texte superposé pour le positionner à l'endroit exact que vous souhaitez sur votre bobine.
7. Cliquez à nouveau sur Terminé .
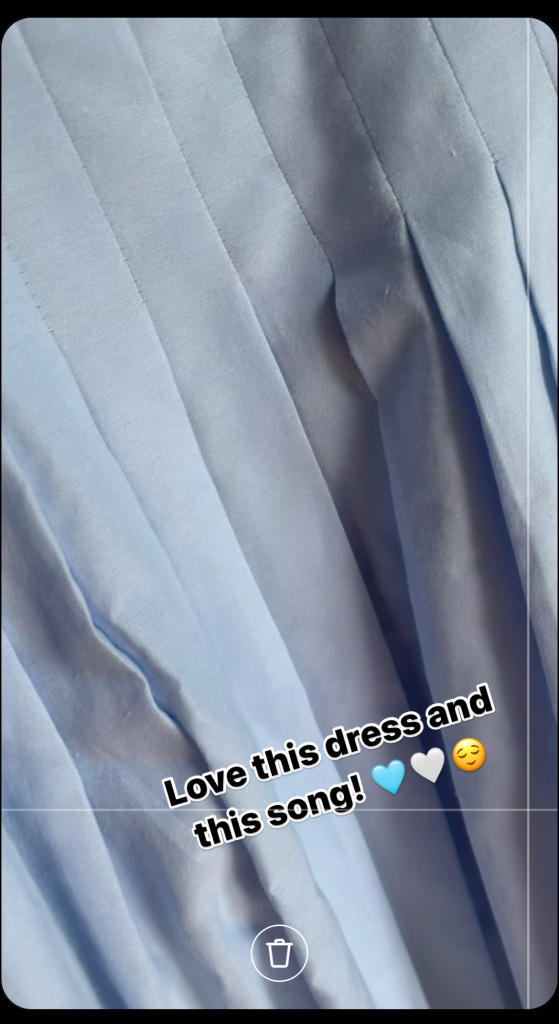
8. Comme pour la vidéo et l'audio, faites glisser les bords de votre incrustation de texte pour la raccourcir ou l'allonger.
4. Comment utiliser un écran vert pour des bobines plus créatives
Celle-ci n'est pas vraiment basique, mais c'est une technique qui connaît un succès fulgurant sur Instagram. Si vous voulez cartonner sur Reels, vous devez au moins comprendre comment ça marche.
L'utilisation d'un fond vert vous permet de créer toutes sortes d'arrière-plans pour vos Reels. C'est un outil formidable pour laisser libre cours à votre créativité, surtout lorsque vos vidéos comportent beaucoup d'éléments narratifs. Voici comment cela fonctionne pour les Reels :
1. Installez un écran vert chez vous ou dans votre studio.
2. Placez-vous face à l'écran et filmez vos vidéos.
3. Téléchargez une application de montage qui utilise la technique du chroma key, également appelée « écran vert ». Nous vous recommandons vivement KineMaster, l'une des meilleures applications tierces pour le montage des Reels.
4. Ouvrez l'application et importez vos vidéos d'écran vert.
5. Utilisez la fonction chroma key de l'application pour modifier l'arrière-plan de vos clips. Vous pouvez utiliser d'autres vidéos et photos comme arrière-plan
6. Modifiez vos vidéos comme vous le souhaitez et enregistrez-les sur votre appareil. Téléchargez-les sur l'éditeur Instagram Reels et effectuez les modifications nécessaires.
Peut-on modifier un Reel après l'avoir publié ?
Instagram vous Instagram de modifier des publications telles que des photos et des carrousels, mais est-il possible de modifier une Reel après sa publication ?
Oui, vous pouvez modifier ou changer certains éléments de vos Reels après leur publication. Il s'agit notamment de la photo de couverture, de la légende et du lieu associé à votre publication Reel. Pour ce faire, rendez-vous sur le Reel en question dans votre Instagram . Cliquez ensuite sur les trois points situés en haut de la vidéo, puis sélectionnez «Modifier ». Vous pourrez alors apporter les modifications nécessaires aux informations de base.
Cependant, vous ne pouvez rien modifier dans la vidéo ni dans la façon dont vous l'avez montée. Si vous souhaitez modifier le montage de votre Reel, la seule solution est de le supprimer et de le republier.
Instagram une plateforme réputée pour préserver l'authenticité à tout prix. C'est pourquoi elle n'autorise pas les utilisateurs à modifier des Reels qui ont déjà été publiés et vus par un large public. Lorsque vous modifiez une vidéo, vous altérez en effet l'esthétique et le message de votre publication. Cela peut induire en erreur de nouveaux publics, surtout si la publication originale a généré un grand nombre de vues et d'interactions.
Peut-on ajouter de la musique à une bobine après l'avoir postée ?
Vous vous demandez : « Peut-on ajouter de la musique à un Reel après sa publication ? » Malheureusement, tout comme pour le montage des extraits vidéo, il n'est pas possible d'ajouter ou de modifier la musique d'un Reel déjà publié.
Vous n’êtes pas sûr d’aimer la bande-son d’origine qui accompagne les extraits vidéo de votre Reel ? On comprend. Parfois, ce n’est qu’après avoir visionné votre Reel dans son intégralité, une fois publié, que vous vous rendez compte que certains éléments mériteraient d’être améliorés. Peut-être avez-vous pensé à de meilleurs effets sonores pour votre Reel que ceux que vous avez utilisés. Ou peut-être ne supportez-vous pas qu’un de vos extraits ne soit pas en phase avec le rythme de la chanson de fond. Malheureusement, la seule façon de modifier la musique de votre Reel est de le supprimer, de le rééditer et de le republier.
On le sait bien : c'est un vrai casse-tête. Mais si tu penses que ton Reel pourrait être dix fois plus captivant avec une autre musique de fond, n'hésite pas !
Les meilleurs filtres pour les bobines Instagram
L'utilisation de filtres sur le site Instagram est un excellent moyen d'améliorer et d'embellir vos photos. Mais saviez-vous que vos filtres photo préférés sont également disponibles sur les bobines ?
Les filtres permettent de garantir une apparence et une ambiance homogènes à tous les extraits vidéo de votre Reel. En choisissant le bon filtre, vous rendez également votre Reel plus accrocheur, ce qui est idéal pour attirer davantage de vues. De plus, c’est le moyen idéal pour donner un coup de fouet visuel à vos Reels, même si vous ne maîtrisez pas l’étalonnage des couleurs.
Voulez-vous rehausser l'ambiance et la sensation de votre bobine à l'aide d'un filtre cool ? Voici quelques-uns des meilleurs filtres pour les bobines Instagram :
- Paris: Illumine et adoucit vos vidéos pour un rendu fluide et aérien.
- Oslo: Augmente le contraste et la chaleur pour une vidéo à l'aspect chaleureux.
- Tokyo: Un filtre classique en noir et blanc qui donne une touche sombre à votre Reel.
- Jaipur: Il rehausse la saturation des couleurs tout en adoucissant les teintes, pour un rendu plein de vie.
- Rio de Janeiro: ajoute un dégradé de couleurs à vos clips vidéo pour créer une ambiance joyeuse et dynamique.
Outre les filtres photo, vous pouvez également utiliser des filtres de réalité augmentée (ou filtres RA) sur Reels. Ces filtres ajoutent des objets en 3D et des éléments numériques à votre environnement réel via l'écran. La plupart du temps, les utilisateurs se servent des filtres RA pour embellir leur visage dans leurs vidéos. Ces filtres peuvent par exemple ajouter du maquillage à votre visage ou des éléments graphiques mignons et des accessoires à l'écran.
Vous souhaitez publier une bobine de vous-même avec un filtre AR pour une vidéo plus dynamique ? Il vous suffit d'enregistrer une vidéo de vous en utilisant le filtre de votre choix dans l'éditeur de bobines.
Faites en sorte que vos bobines atteignent leur plein potentiel en développant votre audience sur IG
Le montage Instagram peut sembler intimidant. Mais n’oubliez pas : c’est en forgeant qu’on devient forgeron. Lancez-vous et essayez de créer des Reels simples en utilisant des techniques de montage de base. Entraînez-vous à découper des extraits vidéo, à ajouter du texte en superposition et à tester différentes musiques dans vos vidéos. Très vite, vous prendrez le coup de main et pourrez commencer à explorer des fonctionnalités plus avancées, comme l’utilisation d’écrans verts et de transitions fluides.
Maintenant que vous savez comment modifier vos Reels sur Instagram, il est temps de passer à l'étape suivante : générer des vues. Pour cela, le mieux est de vous assurer que vous disposez d'une audience active. C'est là que Path Social vous aider.
Notre algorithme exclusif identifie précisément votre public cible. Nous mettrons ensuite en œuvre des stratégies promotionnelles de premier ordre pour diffuser votre contenu. Non seulement vous constaterez une forte augmentation du nombre de « j'aime », de commentaires et d'interactions sur vos publications, mais vous gagnerez également de nombreux nouveaux abonnés. Et le plus beau dans tout ça, c'est que tous ces nouveaux fans sont 100 % réels, jamais faux. Développez votre présence sur Instagram nous dès aujourd'hui !



Vous souhaitez développer naturellement votre Instagram ?
Découvrez une plateforme conçue pour aider les créateurs à toucher un public authentique et engagé, sans prendre de raccourcis.
Explorez la plateforme