Comment supprimer l'arrière-plan d'une photo - Guide complet

Imaginez que vous ayez pris une photo fantastique. Tout est parfait, de la lumière à votre pose. Le seul problème, c'est l'arrière-plan : il détourne l'attention du sujet principal et nuit à l'image. C'est frustrant, n'est-ce pas ? C'est un problème classique qui préoccupe depuis longtemps les photographes, les artistes et les designers. Si vous ne connaissez pas bien les applications, la question « Comment supprimer l'arrière-plan d'une photo ? » doit également vous frustrer. Mais ne vous inquiétez pas : nous avons toutes les réponses !
Supprimer l'arrière-plan d'une photo ou modifier la couleur d'arrière-plan Instagram ouvre de nouvelles perspectives créatives. Cela vous permet d'isoler votre sujet et de le placer dans un décor entièrement nouveau, apportant ainsi une touche professionnelle à vos œuvres d'art, vos créations ou vos images.
Apprendre à maîtriser la technique de suppression d'arrière-plan est un talent qui vaut la peine d'être développé — si vous souhaitez réaliser des photos exceptionnelles, des visuels accrocheurs ou des collages esthétiquement captivants. Alors, commençons à apprendre.

Comment supprimer l'arrière-plan d'une photo en 4 étapes simples
Voici quatre étapes simples pour supprimer un arrière-plan d'une photo :
Étape 1 : Sélectionnez le logiciel ou l'application de retouche photo de votre choix. Photoshop et Canva sont deux choix courants.
Étape 2 : Ouvrez l'image sur votre application à laquelle vous voulez enlever un arrière-plan.
Étape 3: Trouvez une fonction ou un outil qui vous permet d'ajouter ou de modifier l'arrière-plan. Vous pouvez utiliser le panneau "Calques" de Photoshop pour ajouter un calque pour l'arrière-plan.
Étape 4: Vous pouvez désormais télécharger ou partager votre image.

Meilleures méthodes pour "Comment supprimer l'arrière-plan d'une photo"
Heureusement, il existe plusieurs méthodes et technologies pour faciliter cette tâche. Les possibilités sont nombreuses, allant des applications sophistiquées de retouche photo comme Adobe Photoshop à des sites web conviviaux. L'objectif commun à toutes ces méthodes est de séparer en douceur le sujet de l'arrière-plan, chacune présentant des atouts qui lui sont propres.
Mais pour ceux qui souhaitent une approche plus automatisée, les logiciels d'IA sont aujourd'hui à la portée de tous. Grâce à eux, vous pouvez supprimer l'arrière-plan et rendre vos photos plus attrayantes avec une grande précision. Ils constituent désormais des solutions très prisées par ceux qui recherchent une solution simple et rapide.
Poursuivez donc votre lecture pour découvrir tous les détails de cette approche révolutionnaire. Nous allons vous révéler l'essentiel sur la façon de supprimer l'arrière-plan d'une photo. Prêt à améliorer votre jeu sur Instagram ? Lisez la suite.
Comment supprimer l'arrière-plan d'une photo dans Photoshop
Vous pouvez facilement supprimer l'arrière-plan indésirable de votre image avec le logiciel gratuit de suppression d'arrière-plan: Adobe.
Pour savoir « comment supprimer l'arrière-plan d'une image dans Photoshop », ouvrez la photo dans Photoshop. Repérez ensuite le panneau des calques situé à droite de votre écran. Vous pouvez dupliquer le calque actuel en appuyant sur Commande+J sur un Mac ou sur Ctrl+J sur un ordinateur Windows.
Vous y êtes presque. Recherchez l'icône « Supprimer l'arrière-plan » dans la fenêtre « Actions rapides ». Cliquez dessus, et Photoshop s'occupera du reste. Votre sujet restera inchangé tandis que l'application supprimera automatiquement l'arrière-plan.
Lorsque vous l'utilisez, n'oubliez pas qu'il s'agit d'un moyen rapide et simple de supprimer un arrière-plan. Il se peut que les contours de votre image ne soient pas parfaitement lisses. Cela dit, si cela ne vous dérange pas, cela vaut la peine d'essayer.
Voici deux fonctionnalités d'Adobe Photoshop qui vous seront utiles :
Outil de sélection rapide
Il s'agit d'un outil pratique qui détecte rapidement l'endroit où la zone du sujet se termine et où l'arrière-plan commence dans votre image grâce à une technologie de pointe.
Cet outil fonctionne bien lorsqu'il existe une différence nette entre l'objet principal que vous sélectionnez et l'arrière-plan qui se trouve derrière. En revanche, il peut s'avérer difficile à utiliser si les couleurs ou les motifs sont trop similaires. Vous devrez peut-être passer beaucoup de temps à ajouter ou à supprimer des parties de la sélection.
Après avoir utilisé l'outil de sélection rapide pour créer la sélection initiale, vous pouvez l'étendre ou la réduire. Cela vous permettra de mieux contrôler les parties de l'image à inclure ou à exclure de la sélection.
Si vous vous demandez comment supprimer l'arrière-plan d'une image à l'aide de cet outil, voici les six étapes simples pour vous lancer :
- Allez dans Photoshop et ouvrez votre image.
- Dans la boîte à outils de Photoshop, repérez l'outil « Sélection rapide » dans le menu de gauche. Vous le trouverez à côté de l'outil « Baguette magique ».
- Activez l'option "Améliorer les bords" en cliquant sur la case "Paramètres". Cette option permet d'améliorer la qualité et la douceur des bords de votre sélection.
- Déplacez-vous sur la région que vous souhaitez sélectionner tout en cliquant sur l'outil. L'outil de sélection rapide vérifie la présence de tons apparentés et tente de localiser les limites de la sélection.
- Si vous souhaitez ajouter d'autres éléments, il vous suffit de cliquer dessus et de les faire glisser vers un autre emplacement.
- Vous pouvez également effacer les parties de la sélection de l'outil qui ont pris plus que ce que vous vouliez. Sur un ordinateur Mac ou Windows, maintenez les touches Option ou Alt enfoncées tout en vous déplaçant sur la partie que vous souhaitez éliminer.
Comment supprimer l'arrière-plan d'une image à l'aide de l'outil Effaceur d'arrière-plan ?
L'outil Background Eraser est la réponse à la question "Comment supprimer l'arrière-plan d'une image ?". Le logiciel permet aux utilisateurs de supprimer les arrière-plans des images où le sujet et l'arrière-plan présentent des différences de profondeur apparentes. Il prend la couleur au centre du pinceau et choisit des pixels de la même couleur ou d'une couleur similaire. Vous pouvez passer votre souris sur ces pixels pour sélectionner ce que vous voulez exclure de la toile de fond de votre image. Voici comment procéder :
- Lancez Photoshop et ouvrez votre image.
- Recherchez l'outil « Gomme d'arrière-plan » dans la barre d'outils de Photoshop. Si vous cliquez sur l'outil « Gomme » et maintenez le bouton enfoncé, ou si vous appuyez sur la touche « E », vous pouvez ouvrir le sous-menu « Gomme » qui le contient.
- Assurez-vous que le pinceau est de la bonne taille. Vous pouvez la modifier à l'aide de la barre de menu ou des touches de crochets [ ou ]. Les pinceaux plus petits sont indispensables pour les zones nécessitant de la précision, car les pinceaux plus grands permettent de travailler plus rapidement. Vous pouvez également agrandir une zone pour vous concentrer sur un détail particulier.
- Veillez à sélectionner une valeur élevée pour la dureté du pinceau. Des contours flous peuvent entraîner l'apparition de marques indésirables. Pour modifier le niveau de difficulté, appuyez simultanément sur la touche Maj et l'une des touches crochets.
- Définissez "Rechercher les bords" comme l'option Limites dans le menu.
- Pour effacer une couleur, placez le centre du pinceau dessus et cliquez. L'outil conservera certaines couleurs tout en supprimant toutes les taches correspondantes dans les limites de tolérance.
- La tolérance de l'outil détermine le nombre de couleurs qu'il peut effacer. Commencez par définir la tolérance à 25, puis modifiez cette valeur si nécessaire.
- Gardez à l'esprit que l'outil efface toute couleur similaire sur laquelle il est placé si le réticule n'est pas sur la couleur d'arrière-plan que vous vouliez effacer.
- Par défaut, l'outil « Effaceur d'arrière-plan » est réglé sur « Échantillonnage continu », ce qui signifie qu'il échantillonne en continu les couleurs lorsque vous faites glisser le pinceau.

Comment supprimer l'arrière-plan d'une photo sur l'iPhone ?
Il y a plusieurs avantages à changer et à supprimer l'arrière-plan de vos histoires Instagram ou de vos photos aléatoires. Vous voulez savoir comment supprimer l'arrière-plan d'une photo sur l'iPhone ? Passons en revue quelques-uns des meilleurs choix pour les utilisateurs d'iPhone et examinons-les étape par étape afin d'en comprendre le fonctionnement.
Comment supprimer l'arrière-plan d'une image Raccourci clavier
En tant qu'utilisateur d'iPhone, vous pouvez télécharger l'application de raccourci de suppression de l'arrière-plan. Elle vous permettra de supprimer facilement l'arrière-plan. Utilisez un raccourci spécifique pour utiliser l'API d'Adobe afin de reconnaître et de supprimer les arrière-plans des images sur votre téléphone.
Cependant, n'oubliez pas que vous ne pouvez pas améliorer ou arranger les bords d'une image modifiée si le raccourci ne modifie pas votre photo avec précision. Voici quelques conseils :
- Installez l'application de raccourci sur votre téléphone.
- Une fois le téléchargement terminé, vous devrez peut-être autoriser l'utilisation d'une application tierce. Pour ce faire, rendez-vous dans les paramètres, sélectionnez « Raccourcis », puis cochez la case « Autoriser les raccourcis non fiables ».
- Vous pouvez désormais y accéder en ligne ou dans la galerie d'applications raccourcies.
- Donnez à ce raccourci le nom de votre choix, par exemple « BG Remover ».
- Pour autoriser et ajouter le raccourci à votre bibliothèque, cliquez sur l'option « Ajouter un raccourci non fiable ».
- Vous pouvez maintenant utiliser l'application pour supprimer l'arrière-plan.
- Vous pouvez sélectionner une image dans la galerie et autoriser l'application à accéder à vos photos.
- Pour enregistrer l'image dans votre galerie, appuyez dessus, cliquez sur l'icône « Partager », puis sélectionnez l'option « Enregistrer l'image ». Pour enregistrer vos modifications, effectuez cette opération avant d'appuyer sur « Terminé » sur l'image.
Comment utiliser l'application de prévisualisation sur Mac pour supprimer les arrière-plans
Bien qu'il ne soit pas spécialement conçu pour la retouche d'images sur l'iPhone, il est utile si vous copiez les photos de votre iPhone sur votre ordinateur ou si vous les synchronisez via iCloud.
Si vous possédez un Mac, vous connaissez sans doute déjà l'application Aperçu, souvent utilisée pour annoter des documents et réaliser des captures d'écran. Mais Aperçu propose également des fonctionnalités intéressantes de retouche photo. « Instant Alpha », son outil intégré, peut vous aider à supprimer l'arrière-plan de vos images.
Voyons les six étapes à suivre pour supprimer l'arrière-plan d'une photo sur un iPhone et traduisons-les en Avant-première :
- Ouvrez Aperçu sur votre Mac et sélectionnez l'image que vous souhaitez modifier.
- Cliquez sur le bouton Markup dans la barre d'outils. Il a l'apparence d'une pointe de stylo.
- Recherchez le bouton Instant Alpha qui ressemble à une baguette magique et cliquez dessus.
- Sélectionnez la zone de la toile de fond que vous souhaitez effacer en cliquant et en faisant glisser votre curseur dessus. L'application Aperçu choisira automatiquement les pixels adjacents de la même couleur. La zone que vous sélectionnez est mise en évidence en rose.
- Appuyez sur la touche Suppr de votre clavier pour effacer les pixels de l'image.
- Si nécessaire, suivez les étapes 4 et 5 pour supprimer l'arrière-plan dans son intégralité. Vous devrez peut-être répéter cette procédure plusieurs fois pour supprimer complètement l'arrière-plan, car la fonction « Aperçu » ne supprime que certaines parties de la zone sélectionnée.
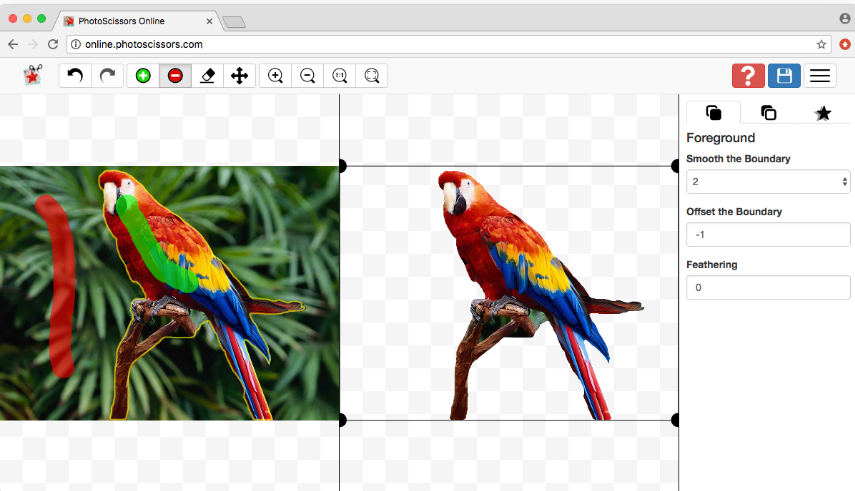
Comment supprimer l'arrière-plan d'une photo à l'aide de PhotoScissors
L'application PhotoScissors est disponible sur iPhone et iPad. Pour les utilisateurs de Mac qui souhaitent une alternative en ligne, il existe également une version pour ordinateur de bureau. Il y a toutefois une restriction : vous ne pouvez pas enregistrer vos photos modifiées dans la version gratuite. Vous disposez au départ de cinq crédits dans la version gratuite et pouvez modifier une image par crédit.
Voici comment supprimer l'arrière-plan d'une photo à l'aide de PhotoScissors :
- Allez dans l'application et téléchargez l'image pour supprimer l'arrière-plan.
- L'application marque un masque vert sur le sujet principal (votre photo).
- Pour choisir une image à publier depuis votre smartphone, ouvrez l'application et appuyez sur l'icône représentant un dossier.
- L'application marque l'image d'un masque vert que vous souhaitez supprimer.
- N'oubliez pas que tout ce qui est recouvert par le masque vert fera partie du découpage final, tandis que tout ce qui se trouve en dehors du masque sera supprimé pour créer l'arrière-plan.
- Tracez avec votre doigt certains aspects que vous souhaitez mettre en valeur et insérez la découpe si l'application ne s'applique pas correctement.
- Enfin, appuyez sur pour examiner la photo sans l'arrière-plan si vous êtes satisfait du masque.
Comment supprimer l'arrière-plan d'une photo à l'aide de Pixel Cuts
Avec les bons outils, vous pouvez facilement supprimer l'arrière-plan d'une photo. Par exemple, Pixel Cuts vous permet de le faire en trois étapes simples. Voici comment procéder :
- Prenez une photo, ou choisissez-en une dans votre galerie.
- Pour supprimer l'arrière-plan, faites glisser votre doigt vers le bas sur le curseur.
- Une fois l'arrière-plan supprimé, vous pouvez, si nécessaire, lisser les bords de la découpe. Pour utiliser les outils de retouche « Effacer » et « Restaurer », sélectionnez « Affiner ».

Comment supprimer l'arrière-plan d'une image dans Canva
Apprenez à supprimer l'arrière-plan d'une image dans Canva en suivant ces trois étapes.
1. Ouvrir Canva
Allez sur Canva et téléchargez une photo dont vous voulez changer l'arrière-plan. Vous pouvez le faire en la recherchant dans la boîte à outils "What will you design today". Vous verrez l'option "Projets" sur le côté gauche de l'écran. Cliquez dessus pour sélectionner le projet de votre choix.
2. Cliquez sur "Modifier la photo" dans le menu
Une fois le projet ouvert dans Canva, sélectionnez l'image dont vous souhaitez supprimer l'arrière-plan. Recherchez le lien « Modifier la photo » situé dans le coin supérieur gauche de votre écran. Appuyez sur ce lien pour accéder aux options d'édition de l'image choisie. Vous verrez alors apparaître les options d'édition sur le côté gauche de votre tableau de bord Canva.
3. Sélectionner l'outil de suppression de l'arrière-plan
Sélectionnez l'outil « Suppression de l'arrière-plan » une fois que vous avez accès aux options d'édition. Grâce à cet outil, vous pouvez effacer l'arrière-plan de votre image pour ne conserver que votre sujet principal. Et voilà ! C'est aussi simple que ça de supprimer un arrière-plan avec Canva.
Comment supprimer l'arrière-plan d'une photo - En bref
Un arrière-plan de mauvaise qualité ou une méconnaissance des outils de retouche photo ne devraient pas freiner votre créativité photographique. Après avoir parcouru ce guide complet, vous disposez désormais de plusieurs techniques pour supprimer l'arrière-plan de vos images à l'aide d'Adobe Photoshop, de Canva ou d'une application spécialisée telle que PhotoScissors.
Mais alors que vous repoussez les limites de la photographie et de la narration visuelle, pourquoi ne pas élargir votre audience et partager votre travail exceptionnel avec un public plus large sur Instagram? C’est là que Path Social en jeu. Nous disposons d’une plateforme interne exclusive regroupant Instagram et d’un algorithme de ciblage basé sur l’IA, développé en interne, pour suivre tous vos Instagram , , vous garantissant ainsi de vous constituer une Instagram authentique et durable.
Alors, pourquoi limiter vos superbes visuels à votre réseau local alors qu'ils peuvent captiver des audiences dans le monde entier ? Commencez dès aujourd'hui à vous développer et à gagner des adeptes sur Instagram . Le monde attend votre prochaine image captivante !





Vous voulez suivre la croissance de votre compte Instagram ?
Analysez vos progrès et obtenez des informations précieuses grâce à notre outil de suivi gratuit !
Vérifiez la croissance de votre compte Instagram dès maintenant