How To Edit Reels on Instagram: Editing Basics You Must Know
If you want to thrive on Instagram, you can’t rely on simple images and carousel posts forever. You need to get on Reels—those little bite-sized, short-form videos that everyone is scrolling through like crazy. According to HypeAuditor, Reels is the Instagram content format that has the highest reach. So, it’s a must for any content creator. Of course, you’ll need to know how to edit Reels on Instagram before you jump into posting viral Reels videos.
Your Reels won’t be successful or go viral if you don’t edit them well. From engaging audio to seamless transitions, you must be able to tell an interesting story effectively through thoughtful, witty editing.
That’s why today, we’re making it our mission to take you through the Reel editing process. By the end of this guide, you should know the basics of how to edit Instagram Reels so they shine. Keep scrolling to discover more!

How To Edit Reels on Instagram: 4 Basic Features To Know
Don’t worry—no one expects you to know how to edit Reels like a professional cinematographer or film director overnight. However, the least you can do is learn the basic editing features of Instagram’s Reels editor. That way, you can start creating entertaining, relevant Reels for your audience as you slowly learn more advanced features.
Knowing editing basics is a great way to get your foot in the door of the world of Reels. Even with minimal knowledge, you can express yourself creatively through short-form videos. Plus, you also knock out the competition, especially if your brand’s top competitors in the industry aren’t Reels-savvy. By nailing the editing process and publishing interesting Reels, you can engage your audience and build a stronger brand.
Are you ready to learn the basics of how to edit a reel on Instagram? Here are five key techniques you need to be familiar with to start your journey.
1. How To Edit Clip Length in Reels
First, let’s take a look at how to edit clip length in Reels. When you edit a clip’s length, you “trim” it so that you cut off parts of it that aren’t relevant. That way, you can make more room for important video clips within your Reel. Trimming clips is also important if you want your videos to match a specific rhythm.
Here’s how to add a video or photo to your Reel and then edit its length in the final video.
1. On the Instagram home page, click the plus sign at the bottom to make a new post.
2. Select Reel and import photos and videos from your gallery to add to your project. You can also record a photo or video on the spot with the camera.
3. Once you’ve selected or recorded video clips, they’ll show up as bars on the Reels editor.
4. Tap on the clip that you want to trim. You should see a yellow box with thicker edges surrounding that bar. That means you’ve selected that clip.
5. Click on either edge of the clip and drag it to trim it down. Dragging it to the right will cut down its length, while going to the left will prolong it. You can do this multiple times until you finally get the video length right.
2. How To Trim Music on Instagram Reels
Adding music is a terrific way to make your Reels more vibrant and exciting. Sometimes, your background music and sound effects make or break your Reel. So, you need to know how to add music to your short-form videos.
But you can’t just add any sound you want and then call it a day. You also have to be strategic about which parts of a song you include in your Reel. That’s why learning how to trim music on Instagram Reels is just as important.
Here’s how to add and trim music on your Reels, step by step:
1. On the Reels editor, tap the Add Audio button at the bottom of the screen. It should have the music note icon on it. Alternatively, click Tap to add audio below your imported video clips.
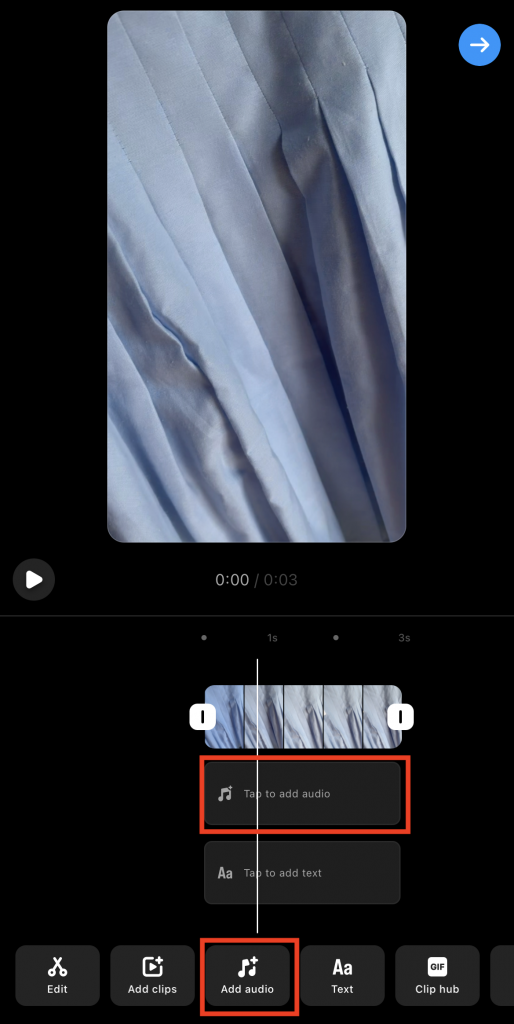
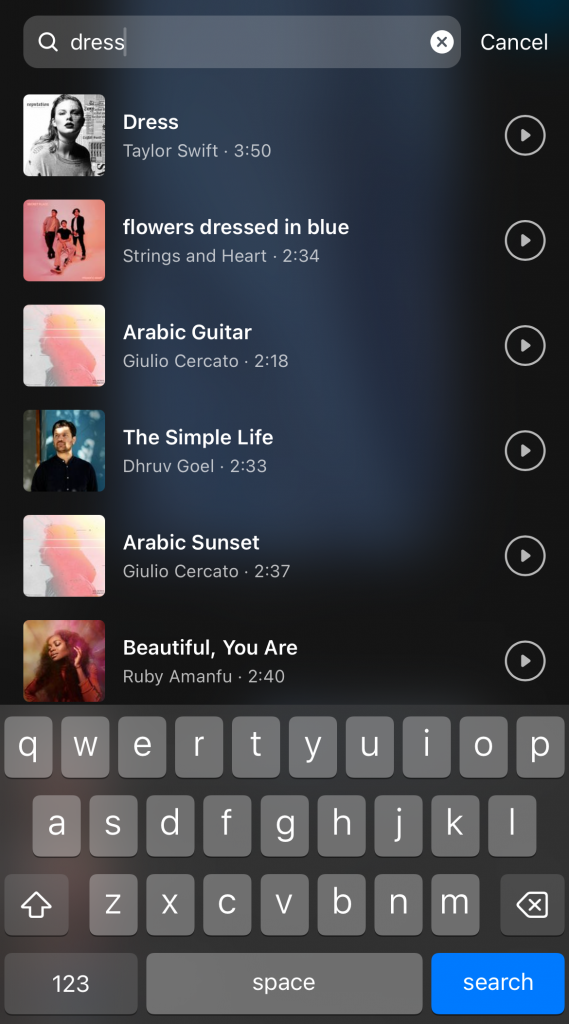
2. The music library should pop up. Type the song you want to include in your Reel.
3. Find the song from the results that appear and tap it once you find it.
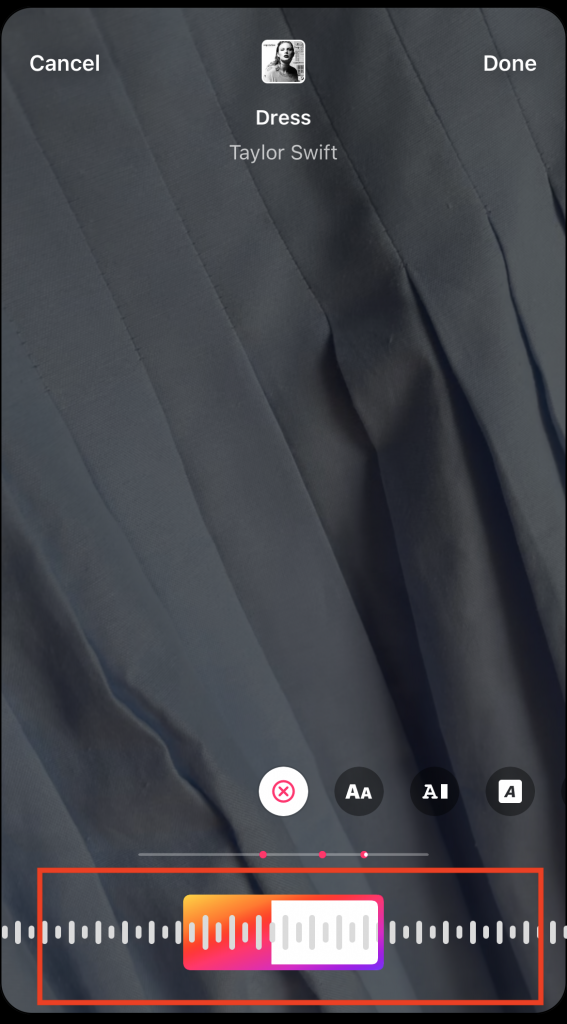
4. On the next screen, you’ll hear your song playing. Drag the bar at the bottom of the screen to choose which part of it to add to your Reel. Then, click Done.
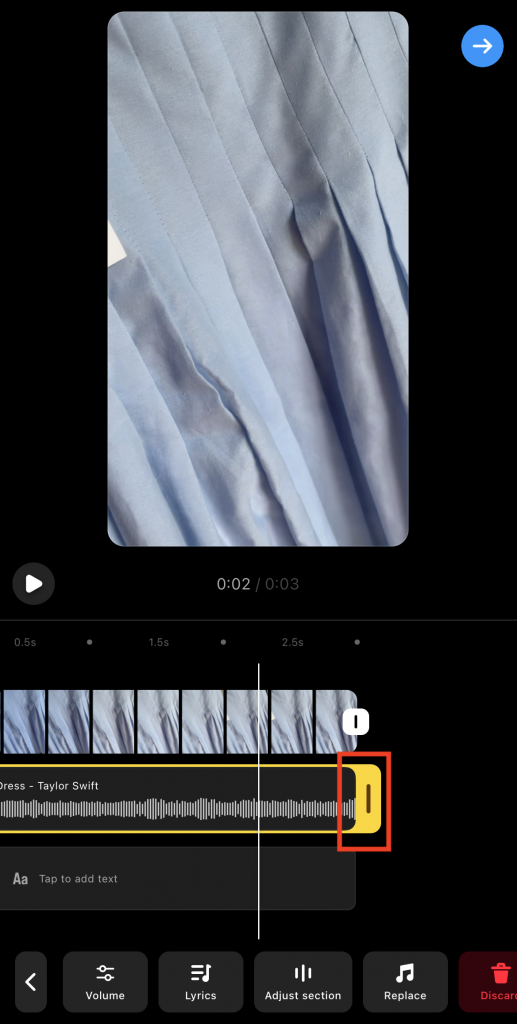
5. Drag the edges of the audio clip in the Reels editor to trim it down or make it longer.
3. How To Add Text Overlay to Your Video Clips
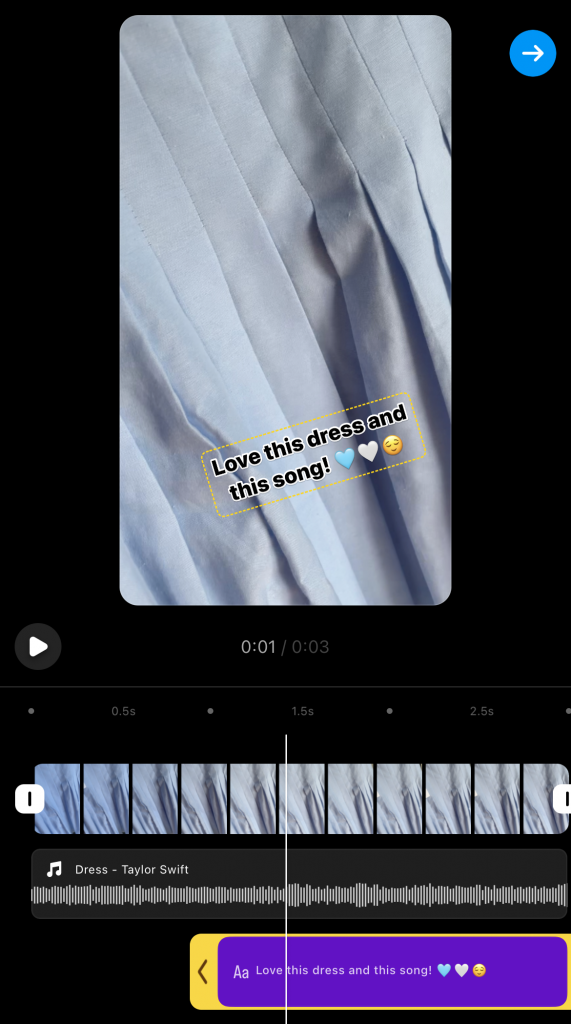
Adding text overlays is a great way to add more context to your videos. It’s also fantastic as subtitles, just in case your viewers watch your Reel on mute. That way, you still get your message across. Here’s how to add these overlays over your videos:
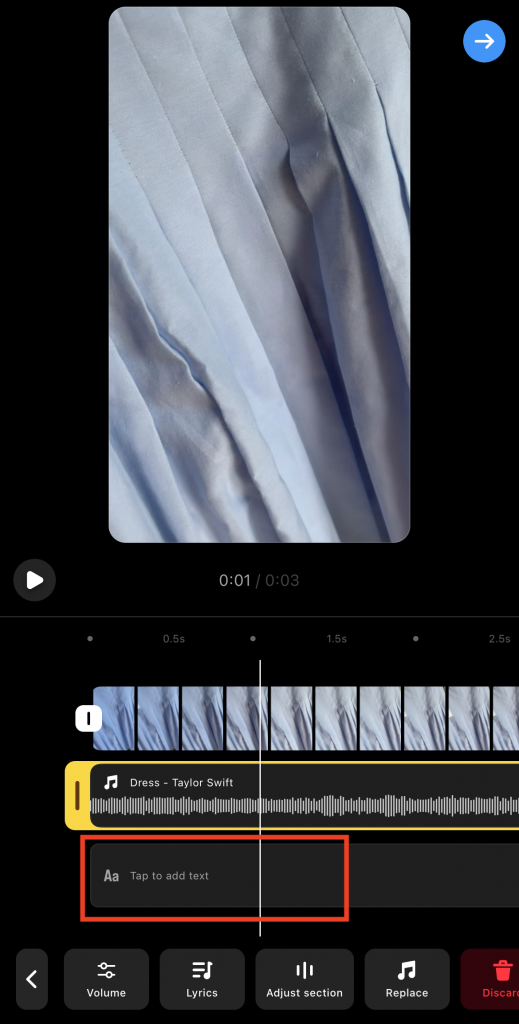
1. On the Reels editor, click the Text icon at the bottom of the screen. You can also click Tap to add text below your selected music clip.
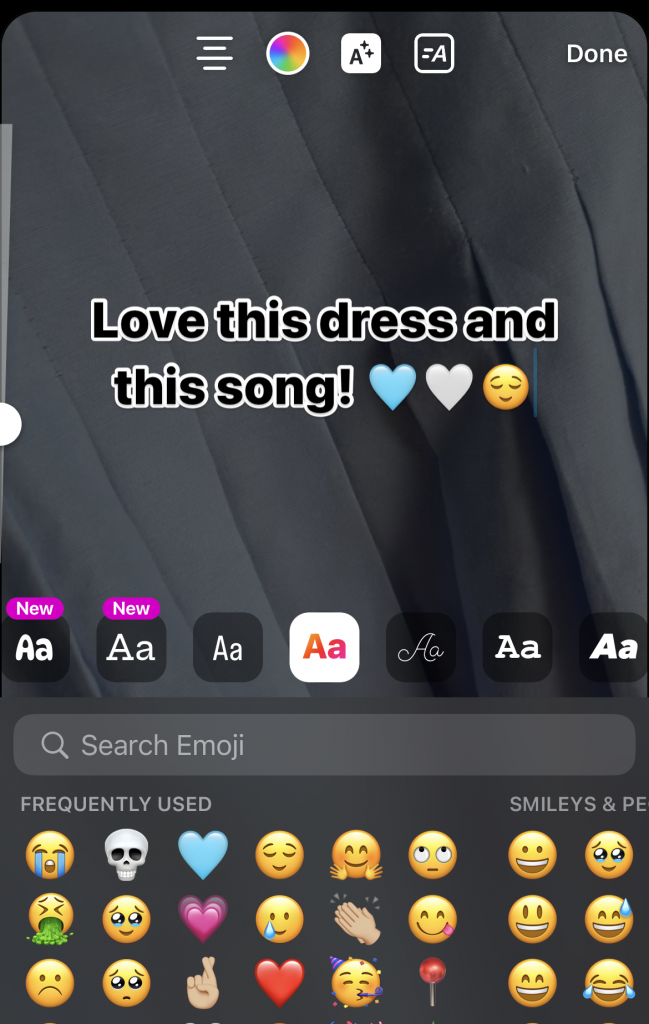
2. Select one of the many fonts available.
3. Type what you want your text overlay to say.
4. Customize your text with different colors, outlines, and animation effects.
5. When you’re happy with your text, click Done.
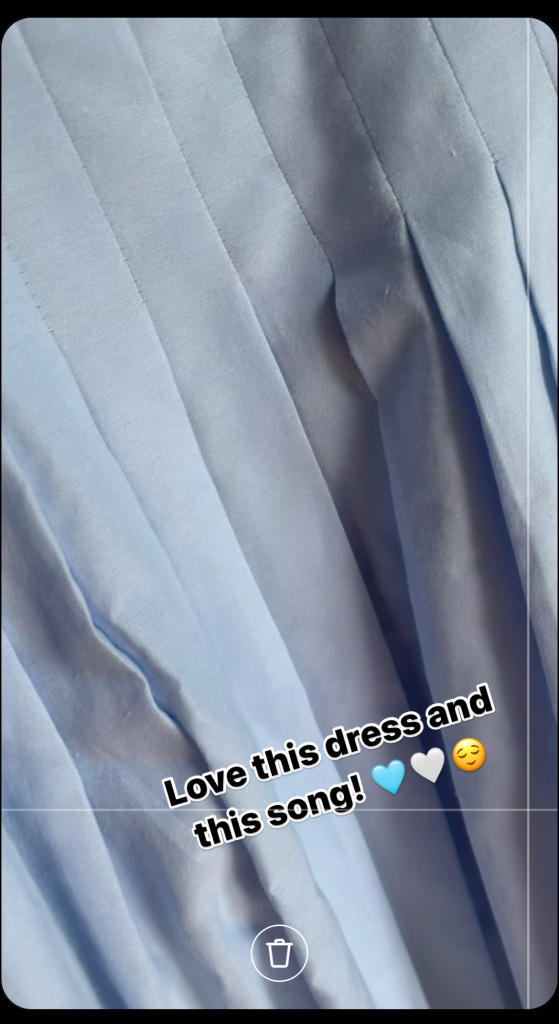
6. Pinch and drag your text overlay to position it to the exact spot you want on your Reel.
7. Click Done again.
8. As with video and audio, drag the edges of your text overlay to trim it down or prolong it.
4. How To Use a Green Screen for More Creative Reels
This one’s not so basic, but it’s a technique that’s been getting really popular on Instagram. If you want to win on Reels, you need to understand at least how it works.
Using a green screen allows you to create all sorts of backgrounds for your Reels. It’s a fantastic tool for unleashing your creativity, especially when there’s a lot of storytelling in your videos. Here’s how it works for Reels:
1. Set up a green screen in your home or studio.
2. Position yourself against the screen and film your videos.
3. Download an editing app that uses a chroma key, aka green screen. We highly recommend KineMaster, one of the best third-party apps for editing Reels.
4. Open the app and import your green screen videos.
5. Use the app’s chroma key feature to change the background in your clips. You can use other videos and photos to use as your background
6. Edit your videos however you want and save them to your device. Upload them to the Instagram Reels editor and make the necessary edits from there.
Can You Edit a Reel After Posting?
Instagram allows you to edit posts like photos and carousels, but can you edit a Reel after posting?
Yes, there are a few things you can change or switch around on your Reels after you’ve published them. These include the cover photo, caption, and location of your Reel post. You can do that by going to the Reel on your Instagram grid. Then, click the three dots on top of the video and hit “Edit.” From there, you can make the necessary changes to the basic details.
However, you can’t change anything in the video and how you’ve edited it. If you want to change how you’ve edited your Reel, the only option is to delete and repost it.
Instagram is a platform known to preserve authenticity at all costs. That’s why they don’t allow people to edit Reels that have already been published and seen by many. When you edit a video, you’re basically altering the aesthetic and message of your post. This can be misleading to new audiences, especially if the original post has garnered lots of views and engagement.
Can You Add Music to a Reel After Posting?
Wondering, “Can you add music to a Reel after posting?” Unfortunately, as with editing the video clips, you can’t add or edit music to a published Reel.
Not sure you like the original audio playing behind your Reel’s video clips? We get it. Sometimes, you’ll only realize something needs improving after you see the full Reel play out once it’s published. Maybe you thought of better sound effects for your Reel than the ones you’ve used. Or maybe you can’t stand one of your clips not being in tune with the background song’s beat. Sadly, the only way to change the music behind your Reel is by deleting, re-editing, and reposting it.
We know—it’s a huge hassle. But if you think your Reel can be ten times more engaging with different background music, go for it!
Best Filters for Instagram Reels
Using Instagram filters is a terrific way to enhance and add some pizzazz to how your photos look. But did you know that your favorite photo filters are also available on Reels?
Filters ensure that all the video clips in your Reel have a consistent look and tone. When you choose the right one, it also makes your Reel more attention-grabbing, which is awesome for getting more views. Plus, it’s perfect for adding some visual oomph to Reels, even if you don’t know how to do color grading.
Do you want to elevate the mood and feel of your Reel with a cool filter? Here are some of the best filters for Instagram Reels:
- Paris: Brightens and softens your videos for a smooth, airy finish.
- Oslo: Increases contrast and warmth for a cozy-looking video.
- Tokyo: A classic black-and-white filter that adds a moody feel to your Reel.
- Jaipur: Boosts your color saturation while softening your hues, creating a lively look.
- Rio de Janeiro: Adds a color gradient over your video clips for a happy, vibrant vibe.
Aside from photo filters, you might also want to use augmented reality filters (aka AR filters) on Reels. These filters add 3D objects and digital elements to your real environment through the screen. Most of the time, people use AR filters to enhance their faces in videos. Filters might add some makeup to your face or cute design elements and accessories on the screen.
Do you want to post a Reel of yourself with an AR filter for a more dynamic-looking video? Simply record a video of yourself using your filter of choice on the Reels editor.
Let Your Reels Reach Their Full Potential by Growing Your IG Audience
Editing Instagram Reels might sound intimidating. But remember—practice makes perfect. Get your feet wet and try to create simple Reels with basic editing techniques. Practice how to trim video clips, incorporate text overlays, and experiment with music in your videos. Soon, you’ll get the hang of it and start exploring more advanced features, like using green screens and seamless transitions.
Now that you know how to edit Reels on Instagram, it’s time for the next step—getting views on them. The best way to do that is by ensuring that you have an active audience. That’s something Path Social can lend a hand with.
Our proprietary algorithm pinpoints your key audience. Then, we’ll use top-notch promotional strategies to get your content out there. Not only will you notice tons of likes, comments, and engagements on your posts, but you’ll also gain plenty of new followers. The best part is that all these new fans are 100% real, never fake. Grow on Instagram with us today!

Want Free Instagram
Followers?
Let our AI targeted organic growth work for you for free
Get Free Instagram Followers


